For our introduction to filming we had to create an eight shot journey. We started off by planning and thinking about what we would like to do, this included brain-storming and story boarding our ideas until we thought of something we would fine easy to produce in the given time.
My final idea was to show someone sitting in a classroom and turning on an ipod, then dancing to the music whilst moving through the collage to the next lesson.
This is my story board
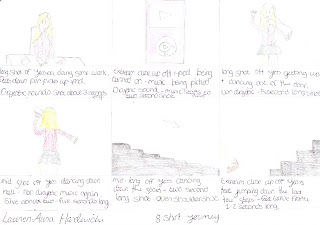
Within the story board i had to include what kind of sound would be used and what sort of camera angles would be included.
I have used all non-diagetic music, which means that the sounds source is neither visible on the screen nor has been implied to be present in the action, instead the music has been added over the top of the filming which reflects the style of dancing.
the camera shots i have included are the follwing:
Medium Shot-Contains a figure from the knees/waist up.
Close-Up -This shows very little background, and concentrates on either a face, or a specific detail of mise en scène. Everything else is just a blur in the background. This shot magnifies the object and shows the importance of things, in this case i have used it for the close up on the ipod being turned on and off as well as other shots.
Long Shot- This category includes the full shot showing the entire human body, with the head near the top of the frame and the feet near the bottom. While the focus is on characters, plenty of background detail still emerges.
Extreme Close-Up -As the name suggests, an extreme version of the close up, generally magnifying beyond what the human eye would experience in reality. An extreme close-up of a face, for instance, would show only the mouth or eyes, with no background detail whatsoever.
Striping the tape.
Before we could start filming we had to strip our tape black for 15mins.
My final idea was to show someone sitting in a classroom and turning on an ipod, then dancing to the music whilst moving through the collage to the next lesson.
This is my story board

Within the story board i had to include what kind of sound would be used and what sort of camera angles would be included.
I have used all non-diagetic music, which means that the sounds source is neither visible on the screen nor has been implied to be present in the action, instead the music has been added over the top of the filming which reflects the style of dancing.
the camera shots i have included are the follwing:
Medium Shot-Contains a figure from the knees/waist up.
Close-Up -This shows very little background, and concentrates on either a face, or a specific detail of mise en scène. Everything else is just a blur in the background. This shot magnifies the object and shows the importance of things, in this case i have used it for the close up on the ipod being turned on and off as well as other shots.
Long Shot- This category includes the full shot showing the entire human body, with the head near the top of the frame and the feet near the bottom. While the focus is on characters, plenty of background detail still emerges.
Extreme Close-Up -As the name suggests, an extreme version of the close up, generally magnifying beyond what the human eye would experience in reality. An extreme close-up of a face, for instance, would show only the mouth or eyes, with no background detail whatsoever.

Striping the tape.
Before we could start filming we had to strip our tape black for 15mins.


